Your Settings Page
Navigate the Settings page to customise subjects, categories, proficiency scales, examples, style guides, and your review team — all per year level.
Your Settings Page
The Settings page is where you personalise how ReportRocket generates report comments for your classes. Everything here is year-level specific — changes you make apply only to the year level you have selected.
Getting There
Click Settings in the navigation sidebar from any page. To return, click the Back to Dashboard button at the top of the Settings page.
Choosing a Year Level
There are two ways to switch between year levels:
- Year level pills — colour-coded buttons across the top of the main content area. The selected year is highlighted so you always know which one you are editing.
- Year level dropdown — in the sidebar on desktop, or in the header bar on mobile.
Tip: On your first visit, a guided tour highlights the year level selector and explains how per-year-level settings work. After completing it once, a Take a Tour link appears at the bottom of the sidebar so you can replay it any time.
Sidebar Navigation
The sidebar organises settings into three groups:
| Group | Sections |
|---|---|
| Curriculum Settings | Subject, Category, Proficiency |
| Collaboration | Review Team |
| App Settings | Examples, Style Guide |
Click any section to load it in the main content area. On mobile, tap the menu icon to open the sidebar.
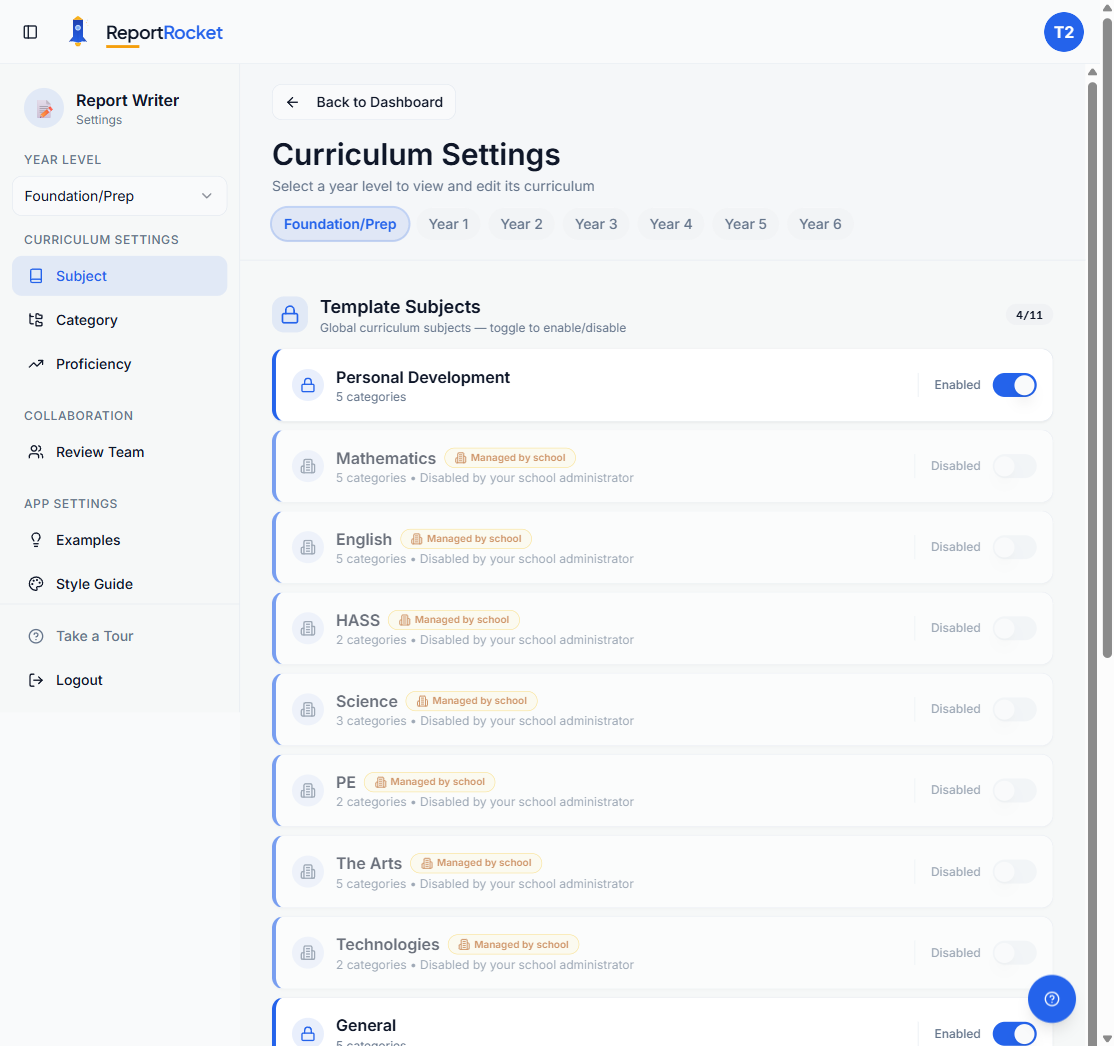
Subjects
Subjects are the top-level curriculum areas (e.g. English, Mathematics, Science).
Three Types of Subjects
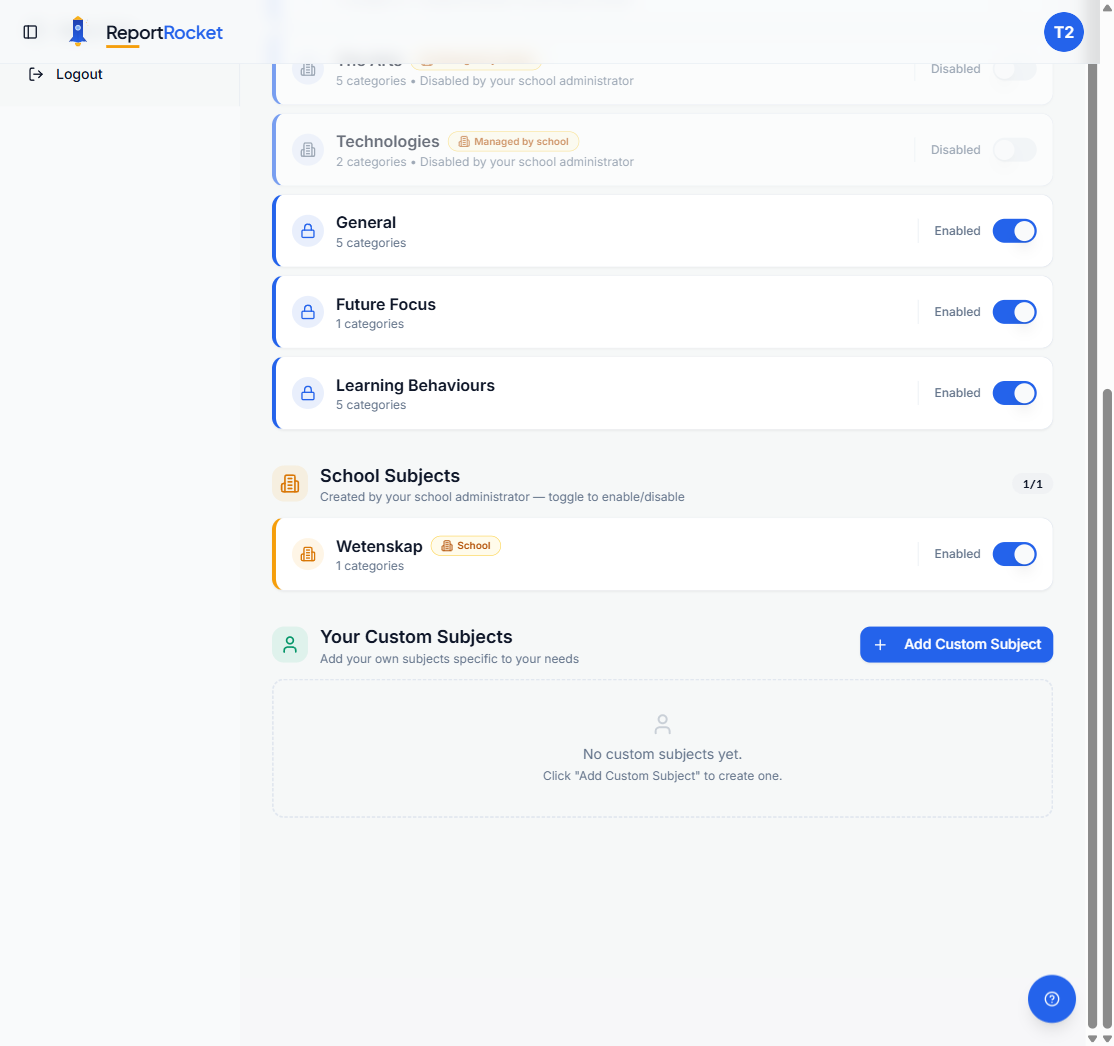
| Type | Badge | What You Can Do |
|---|---|---|
| Template Subjects | Lock icon | Toggle on or off |
| School Subjects | Amber "School" badge | Toggle on or off; only admins can edit or delete |
| Your Custom Subjects | Green border | Add, rename, delete, toggle on or off |
"Managed by school" Badge
If your school administrator has disabled a template subject, you will see an amber Managed by school badge and the toggle will be locked. Contact your school admin if you need this changed.
Adding a Custom Subject
- Click Add Custom Subject
- Enter the subject name (e.g. "Creative Writing")
- Click Add Subject
Editing and Deleting
- Click the pencil icon next to a custom subject to rename it
- Click the bin icon to delete it (this also removes all its categories and criteria)
Template and school subjects cannot be renamed or deleted — only toggled on or off.
Categories
Categories organise criteria within a subject (e.g. "Reading" and "Writing" within English).
- Select a subject from the dropdown at the top of the section
- Expand a category card to see its criteria
- Use the Add Category button to create a new one
- Use the Import button to copy criteria from another year level
Categories follow the same template, school, and custom pattern as subjects — template and school categories can be toggled but not edited.
Proficiency Scales
Proficiency scales define rating levels used during report generation (e.g. High, Medium, Low).
| Type | Appearance | What You Can Do |
|---|---|---|
| Template Proficiencies | Blue card with lock icon | View only |
| Your Custom Proficiencies | White card | Edit, delete |
| System Proficiencies | Grey "System" label | View only |
Creating a Custom Proficiency
- Click Create New
- Enter a name (e.g. "Reading Comprehension Levels")
- Add your levels using the Add Level button
- Click Save
Review Team
School Users
If you belong to a school, your reviewers are managed through school membership. When you assign a Review Pack, you choose from your school's members directly. The Review Team section shows an information card explaining this.
Individual Users
If you are not part of a school, you can add colleagues manually:
- Enter their name and email address
- Click Add Colleague — they receive an invitation email
Each colleague shows a status badge:
- Registered (green) — they have a ReportRocket account
- Needs Account (amber) — they have not signed up yet. Use Resend Invite to send the email again.
To remove a colleague, click the bin icon on their row.
Examples
Example comments teach the AI your preferred writing style and tone.
A badge at the top shows where your current examples come from:
- Using Template or Using School Default (green) — you are using the defaults
- Customised (blue) — you have made personal changes
Adding an Example
- Click Add Example
- Paste a high-quality report comment
- Click Save — a character count appears beneath each example
Copy-on-Write
Editing a template or school example does not change the original. ReportRocket automatically creates a personal version for you. Your school's originals are preserved.
Reverting
Click Revert to Template or Revert to School Default to discard your personal changes and restore the originals. You can revert individual examples or all examples for the selected year level.
Style Guide
The style guide controls how the AI writes — tone, length, and structure.
| Setting | What It Does |
|---|---|
| Min / Max Characters | Character range for generated comments |
| English Variant | Australian English, British English, etc. |
| Style Guide Text | Free-text instructions for the AI |
The same Customised / Using Template badge and Revert button apply here. Editing the template or school style guide creates a personal version automatically.
Tip: Be specific in your style guide text. Instructions like "Use encouraging language. Start each comment with the student's name. Avoid educational jargon." work better than "Write nicely."
Mobile
Settings are read-only on mobile. You will see a banner that says "Settings are read-only on mobile. Use a desktop or tablet to make changes." You can still browse subjects and view your settings, but adding, editing, or deleting requires a larger screen.
Settings Tour
On your first visit to Settings, a three-step guided tour highlights the year level selector and explains how per-year-level settings work. After completing it once, a Take a Tour link appears at the bottom of the sidebar so you can replay it any time.
Next Steps
- Style guides and examples — best practices for writing effective style guides and choosing examples
- Understanding criteria selection — how to select criteria during report generation
- Generating your first report — step-by-step guide to generating your first AI comment
Was this article helpful?